What Is Arthritis?
Arthritis is a type of a disorder of joints which involves inflammation of one or more joints. If one tries to find out about different types of arthritis, then there are more than 100s of them. The most common type is osteoarthritis which occurs due to some form of trauma or infection of joint and age. Other forms of arthritis are rheumatoid arthritis, psoriatic arthritis etc.
What Role Does Yoga Play In Relieving Pain From Arthritis
Yoga is said to play a very important role when it comes to coping up with pain from arthritis. The brilliance of Yoga Asanas or Yoga Poses helps in relief from arthritis pain to a great degree. When someone is affected by arthritis, crystals of uric acid become stored in joints resulting in pain. People suffering from arthritis hesitate to move their joints because of pain but movement and improved joint flexibility is one of the best treatments for arthritis.
Yoga for Arthritis: 9 Best Poses
Below, we will discuss certain yoga poses, which makes sure that the joints stay flexible. The more there is movement in the body the more the joints get flexible and this goes a long way in relieving pain from arthritis. Yoga poses are the best way to keep the body flexible in spite of being in pain.
Surya Namskara or Sun Salutation
How Does Surya Namskara or Sun Salutation Help Arthritis?
This pose is good for overall flexibility of body. This yoga pose helps in loosening up of muscles and hence it is imperative that a person start his or her exercise regimen with this pose. This pose is especially good for knees and thus helps in pain in the knees from arthritis.

How To Do Surya Namskara Or Sun Salutation?
Step 1: The first step to do this pose is the Pranamasana or the Prayer Pose. This is done by:
- Standing at edge of mat and keeping the feet together, balancing the weight equally on both feet.
- Expand the chest and relax the shoulders.
- While inhaling, lift both arms upwards from sides and when exhaling bring the palms together in front of chest as when doing a prayer.
Step 2: The next step is to do the Hastauttanasana or the Raised Arms Pose
This is done when breathing air in and then lifting arms up and back, all the while keeping the biceps close to ears. The aim of this pose is to stretch the whole body up, from heels to fingertips.
Step 3: The next step is the Hasta Padasana or the Hand to Foot Pose
When exhaling, try to bend forwards from waist all the while keeping the spine straight. After finishing out the exhalation completely, bring hands down to floor besides the feet.
Step 4: The next step is to do the Ashwa Sanchalanasana or the Equestrian Pose
While inhaling air, push the left leg backwards as far as possible and then bring right knee to the floor and try to look up.
Step 5: The next step is to do Dandasana or the Stick Pose
With inhalation, take left leg backwards and bring whole body in a straight line.
Step 6: The next step is to do Ashtanga Namaskara.
To do this, gently bring the knees down to floor and breathe out. Move the hips backwards a little bit and now slide forward resting the chest and chin on floor. Raise the posterior side of your body a bit such that your both hands, both feet, both knees, chest, and chin are touching the floor.
Step 7: The next step is to do Bhujangasana or the Cobra Pose
In this, slide forward and raise your chest up into a Cobra posture. The elbows may be kept bent when doing in this pose. The shoulders need to be away from ears. Now, try and look upwards.
Step 8: Now, we do the Parvatasana or the Mountain Pose
Exhaling, we lift the hips and tailbone upwards and move the chest downwards in an inverted “V” shape.
Step 9: Now, we do the Hasta Padasana or the Hand to Foot Pose
Exhaling, bring left foot forward keeping palms on floor. The knees can be bent if required.
Step 10: next step is to do Hastauttanasana or Raised Arms Pose
In this, while breathing in the spine goes up, the hands go up, and the body is bent backwards slightly, pushing hips a little bit in the outward direction.
Step 11: The last step is to do the Tadasana
In this, while exhaling, the body needs to be straightened first and the arms should be brought down. Now, relax in this position and try and observe sensations passing through your body.
Virasana or Hero Pose
How Does Virasana Or Hero Pose Help Arthritis?
This pose is also called as Seated Hero Pose and is classified as one of the best yoga poses for arthritis pain in the knees. This yoga asana gives a 360 degree stretch to knees and keeps the individual on his/her feet which is essential when a person is suffering from arthritis.
How To Perform Virasana Or Hero Pose?

- Kneel down on floor with knees kept apart and thighs parallel to each other.
- Lean in forward direction and turn fleshy part of calves outwards with the hands.
- Breathe out when you sit on floor between both feet. If you have any discomfort or are not able to sit properly on the floor then a prop can also be used.
- Position the hands on top of thighs close to knees with palms facing downwards.
- Relax the shoulders and upper part of the body keeping the spine straight.
- Point the crown of head towards the ceiling and look straight.
- Remain in this pose for about a minute.
Vrikshasana Or The Tree Pose
How Does Vrikshasana Or The Tree Pose Help Arthritis?
This pose strengthens the back. Arthritis can result in severe low back pain and practicing this pose on a regular basis helps in relieving this pain due to arthritis.

How To Perform Vrikshasana Or The Tree Pose?

- Stand in a Tadasana (described above) position. Now, stretch the body.
- Now, shift the bodyweight a little bit on the left foot from right one.
- Bend the right knee and hold it in air for some time.
- Now, with right hand try and catch the foot of right leg.
- Now, try and bring sole of the right foot towards the inner side of left thigh and place it there. Place the foot such that right heel is pressed into the inner left groin and toes should point to the floor.
- Stretch the hands up in air again and join them together in prayer position.
- Look upwards.
- Remain steady and maintain this pose for about a minute and then release.
- While coming out of this asana, bring the body back in Tadasana pose.
- Repeat this at least 10 times everyday.
Setubandha Sarvang Asana or Bridge Pose
How Does Setubandha Sarvang Asana Or Bridge Pose Help Arthritis?
This asana is of great benefit for people who have knee pain which is quite common in arthritis since it stretches it. It also helps the thighs and lower part of back. This pose makes you support yourself on the knees in inverted position.

How Is Setubandha Sarvang Asana Or Bridge Pose Performed?

To do this pose, one has to lie down on back and bend knees such that the feet rest on floor. Now, an attempt is made to lift the body up. This is done about five times to start with and then released, steadily increasing the count for this pose. This asana massages the thighs and the lower portion of back.
Sukhasana or Easy Seat Pose
How Does Sukhasana or Easy Seat Pose Help Arthritis?
This pose is done in a sitting position that you have to get in before doing Pranayama. In this pose, since the knees are bent at 90 degrees, it relieves knee pain due to arthritis if it is done regularly.
How Is Sukhasana Or Easy Seat Pose Performed?

- Take a couple of thick blankets and fold them such that they form a firm base for you to sit on.
- Sit close to the edge of the base with legs stretched out ahead in front of you.
- Cross the shins and widen the knees such that you are able to slip the foot below opposite knee.
- Bend the knees and fold the legs towards the torso.
- Keep the feet relaxed such that outer edges rest on floor and the inner arches are settled below opposite shin. The thighs and crossed shins should be in a position that they form a small triangle. There needs to be a gap between the pelvis and feet.
- Sit with pelvis in a neutral position. For this, press hands against floor and lift the sitting bones slightly. Stay in that position for a few breaths and then lower down yourself back on the floor slowly.
- Balance the tailbone and pubic bone such that they are in same distance from ground.
- Place hands on the knees, palm facing down, and lengthen tailbone towards the floor.
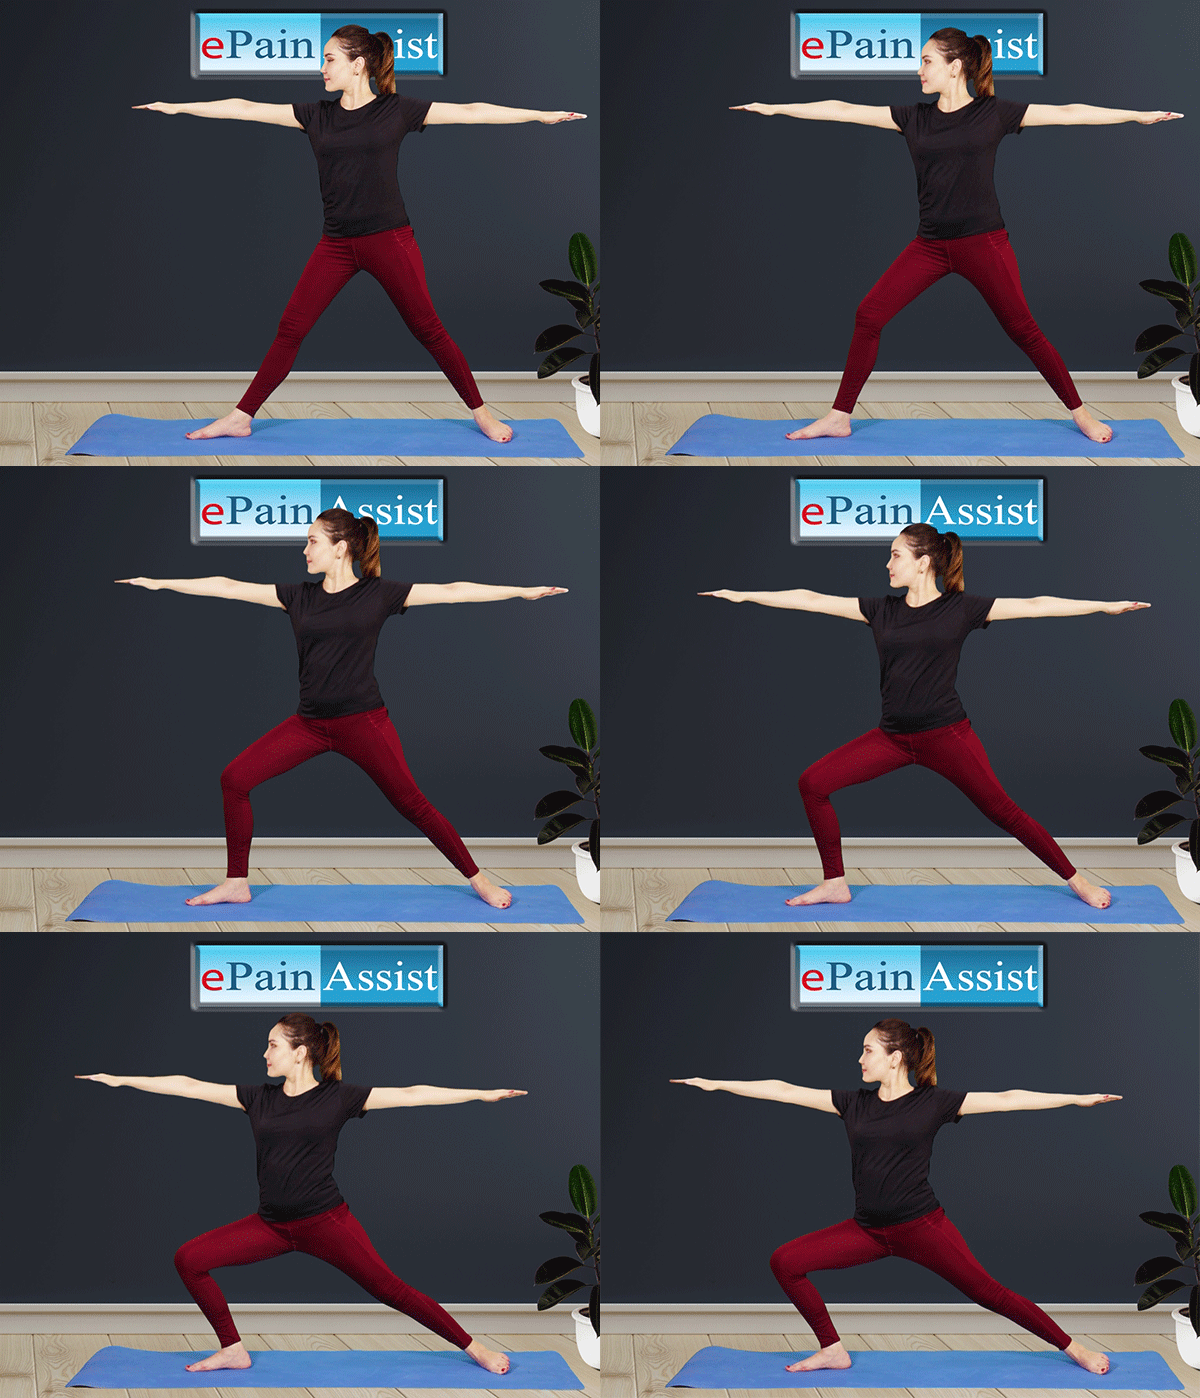
Virabhadrasana or Warrior Pose
How Does Virabhadrasana Or Warrior Pose Help Arthritis?
This pose makes you stretch the hips to a significant degree. Hence, it is beneficial for low back pain due to arthritis.

How Is Virabhadrasana Or Warrior Pose Performed?

- For people who have leg weakness or have balance issues a chair can also be used for this pose.
- For this pose, stretch the arms horizontally as shown in the picture.
- Now, stretch left knee to about 90 degrees.
- Now, try and stretch right leg as much as possible ensuring that it is kept straight.
- The right foot should be kept flat on floor as shown in picture.
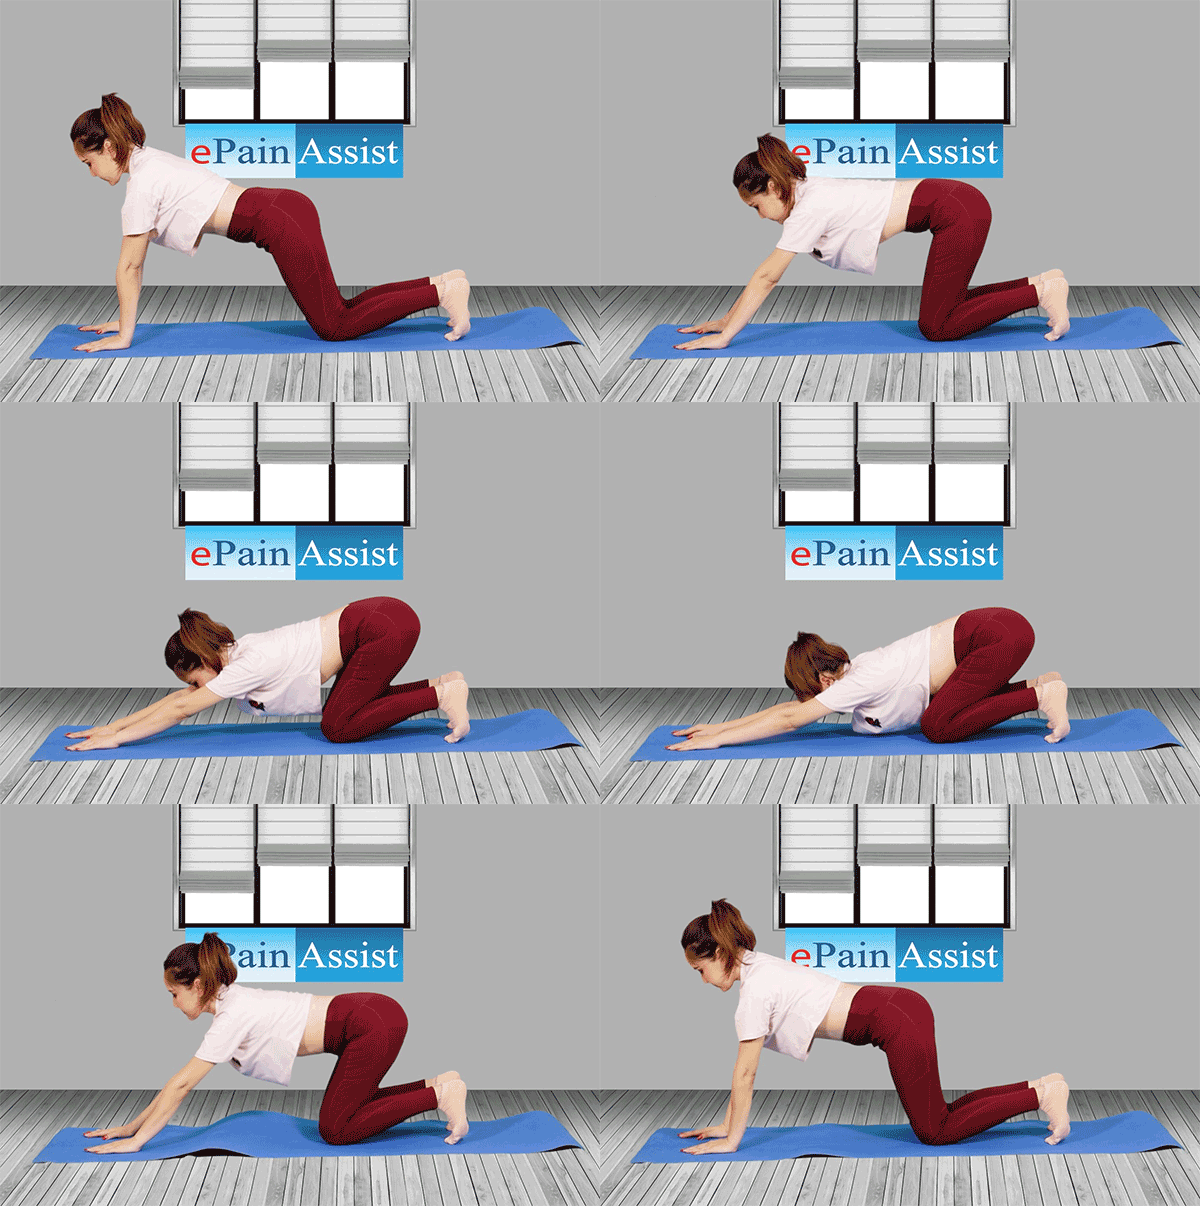
Gowmukhasana or Cow Face Pose
How Does Gowmukhasana or Cow Face Pose Help Arthritis?
This pose is ideal for people with arthritis suffering from neck pain. In this asana, you need to hold the arms from behind and pull the shoulders thus stretching the muscles and joints and increasing flexibility, essential for coping up with arthritis pain. It is a good exercise for neck and back.

How to Perform Gowmukhasana Or Cow Face Pose?

For this pose, you need to bend down on all fours and align knees below hips and the hands below shoulders. When inhaling air, raise the head and tailbone and hence forming a concave curve with low back. With exhaling, round up the back. Slip in tailbone and relax the neck. This pose needs to be repeated at least 10 times. Once the pose is completed, exhale and shift buttocks so that it is about halfway towards feet. You should try and focus on pulling upper body towards fully extended arms and the pelvis towards legs. This stretches the rib muscles.
Balasana or Child Pose
How Does Balasana Or Child Pose Help Arthritis?
This pose needs you to put your head down like an infant and hence it is very relaxing for neck and helps in reducing pain caused due to arthritis.

How Is Balasana Or Child Pose Performed?

- This needs to be started by being in the table pose.
- Then, maintaining position of hands, breathe out air sitting back on your heels and rest your upper body on thighs.
- Keep forehead on floor.
- Place arms next to you with hands next to the feet and palms facing upwards.
- Breathe out air when releasing hips to the heels and feel the spine lengthening.
- Remain in this position for about a couple of minutes.
- Release this pose by taking in air while pressing the hands into floor to lift yourself back in a seated position.
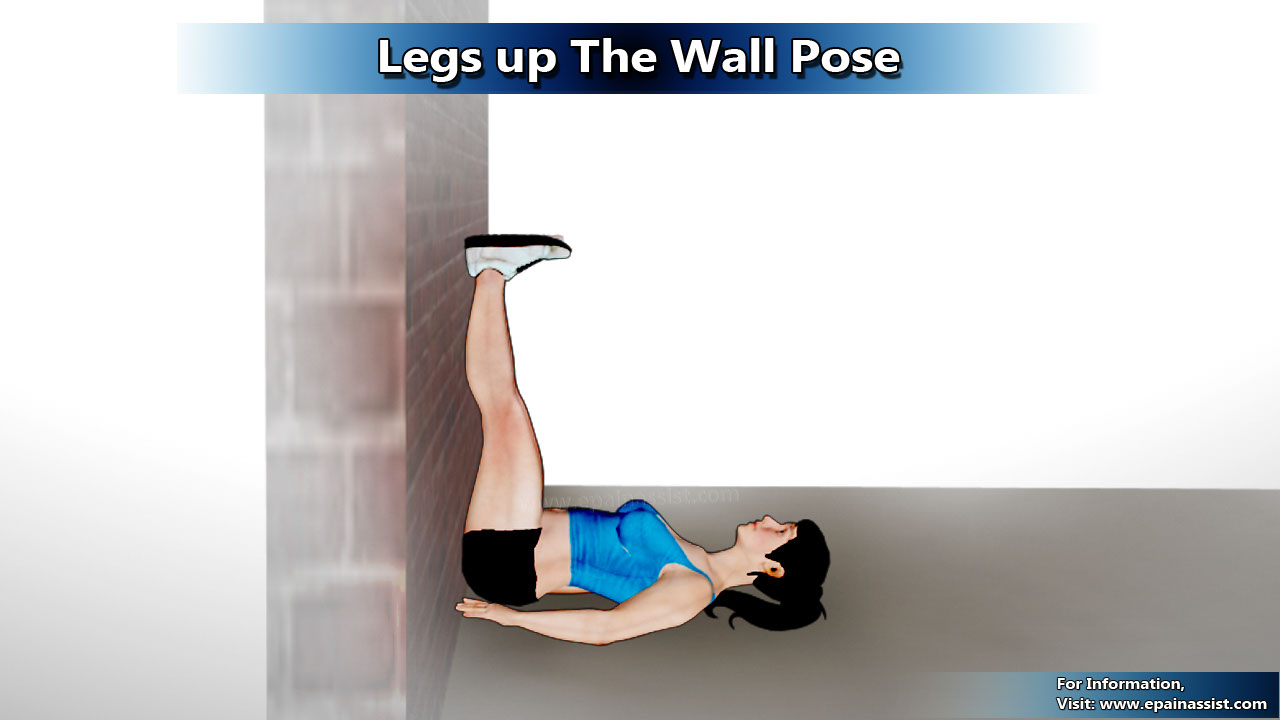
Viparita-Karani Asana or Legs Up The Wall Pose
How Does Viparita-Karani Asana Or Legs Up The Wall Pose Help Arthritis?
Neck pain because of arthritis can be intolerable sometimes. The best solution for this is to try this pose. It is effective, as it keeps the neck at 90 degrees and allows shoulder movement.

How Is Viparita-Karani Asana Or Legs Up The Wall Pose Performed?

- Keep some support on floor a few inches away from a wall.
- Sit down on floor towards right end of support. Place right side of body towards wall.
- Take a deep breath.
- Now move the legs upwards and rest them against the wall.
- Now lower the back and rest the back on floor.
- Now, try and adjust the body such that the hips rest on the support.
- Keep legs straight and try not to bend them from the knees.
- Try to remain steady in this position. Close the eyes. Relax and take a deep breath.
- Place the hands on the floor and relax them.
- Stay this way for about half a minute and then release.
- Try and do this pose at least 10 times a day.
If the poses described above and shown in pictures are done on a regular basis, then it goes a long way in helping relieve arthritis pain.

