Yoga is known to help keep the body weight at bay and helps in getting rid of certain diseases. But most of us do not know that yoga helps in keeping the bones strong and healthy.
Our bones reach their maximum density till we reach 30. After 30, the bones start losing density in both males and females. And, that causes the risk of getting osteoporosis.
Our bones are constantly broken down and built and sometimes the damage is higher which fails to heal or to be built again. However, many research studies have proven that yoga is the answer to osteoporosis.
When there is enough pressure put on the bones and yoga is practiced at a certain intensity, the bones remain healthy and have the capacity to heal and keep the risk of losing bone density. And, thus keeps from the risk of getting osteoporosis.
In addition to the food, the movement also plays a key role in keeping the bones healthy. The list of yoga poses which help in keeping the bones healthy and strong are mentioned below:
Yoga Poses For Better, Stronger, and Healthier Bones
Vrksasana or The Tree Pose
The tree pose is one of the best poses to maintain the bone health. It is said that holding this pose for 1 minute every day on both sides helps in getting stronger bones.

Steps to Practice Vriksasana or The Tree Pose
- To practice Vrikshasana, stand straight on the floor or on the yoga mat.
- Raise your arms above the head.
- Bring your hands above the head to join both palms.
- From this position, bring your left leg from the knee and bring it on the inside of right thigh and rest it there.
- Close your eyes if you are an advanced practitioner and concentrate on the eye center.
- Stay in this position for a few breaths.
- Staying in this position for 1 minute every day is beneficial for the bones.
- Release the pose and stand straight. Practice from both sides.

Utkatasana or The Chair Pose
This yoga pose helps in enhancing the spine flexibility and helps in relieving gastritis when practiced regularly. Also, it is considered very helpful for people with weak bones a sit helps in improving the bone density when practiced regularly.

Steps to Practice Utkatasana or The Chair Pose
- Stand in Tadasana on the floor or on the yoga mat.
- Bring the big toes closer to each other heels should be lying a little apart from each other.
- While practicing Utkatasana or The Chair Pose, you should squeeze your lower abdomen inwards.
- Move your shoulder bones and widen the chest.
- Inhale deeply and take your arms above your head.
- Bend your knees and push down your pelvis, such that it seems like you are seated in an imaginary chair while practicing Utkatasana or The Chair Pose.
- Be aware as you hold the pose, and keep your spine lengthened while practicing Utkatasana or The Chair Pose.
- There is an option to keep your arms above your head to keep them straight in front of your shoulders.
- Thighs must always be parallel to the ground while practicing Utkatasana or the chair pose.
- Stay in this posture for a few breaths.
- Inhale and keep your knees parallel to the ground while practicing Utkatasana or The Chair Pose
- Exhale deeply and leave the pose to stand straight.

Bhujanagasana or the Cobra Pose
This yoga pose helps in keeping the bones healthy by stimulating the bone production and helps in avoiding intense injuries. The stretching helps build the bones which prevent then getting fractured from minor injuries.

Steps to Practice Bhujanagasana or the Cobra Pose
- Lie on your stomach with the top of your feet and chin resting on the floor.
- Your legs should be close to each other with the heels and feet lightly touching each other.
- Place your palms facing downwards in such a way that your palms are resting on floor directly below or a little outside the shoulders.
- While practicing Bhujangasana, the elbows should be kept parallel to each other and close to the body.
- While inhaling deeply, gently raise your head, chest, and abdomen upwards.
- In this position the navel and pelvis must be touching the floor.
- Take your shoulders back and down and tilt to head backwards. Close your eyes in this position and stay in the pose for a few breaths.
- While exhaling, gently release the pose and come back to the starting position.
- Relax with your hand stretched outwards and with your chin resting on the floor.

Setu Bandasana or the Bridge Pose
Setu bandasana or the bridge pose is a therapeutic pose for osteoporosis. This yoga pose helps in relieving the osteoporotic pain in people. It helps stretch back, chest, neck and spine. It maintains the overall health of the body.
Steps to Practice Setu bandasana or the Bridge Pose
- Lie on your back on the yoga mat.
- Bend your knees to bring the sole of your feet to lie flat on the ground.
- The arms should keep resting straight on both sides of your body while resting in this position.
- Lift your lower back from the ground. If you feel comfortable, lift the middle back and the upper back very slowly.
- The pressure in this position should be on the shoulders, arms and your heels.
- Bring your chin to touch the chest and rest in this position for a few breaths.
- This is the final Setu Bandasana pose.
- Release the pose by straightening your legs on the floor or on the yoga mat.
- Relax in Shavasana.

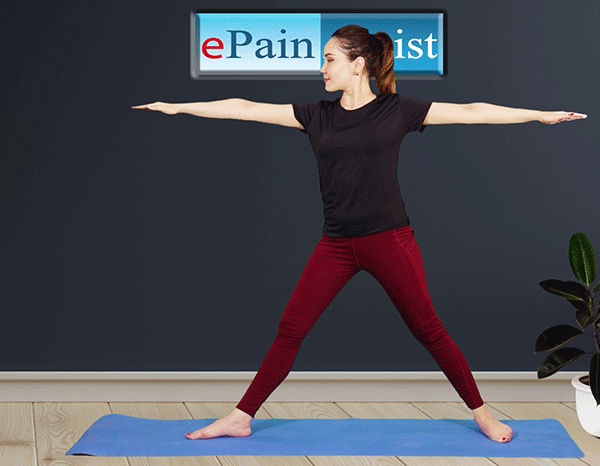
Virbhadrasana I or The Warrior I Pose
This yoga pose is very easy to practice but have a myriad of benefits. It helps in keeping the bones healthy by stimulating the bone production and helps in avoiding intense injuries. The stretching in this yoga pose helps build the bones which prevent then getting fractured from minor injuries.

Steps to Practice Virbhadrasana I or The Warrior I Pose
- Stand in Tadasana or Mountain Pose on the yoga mat.
- Take your feet to rest far from each other. The distance should be more than the shoulder width.
- Turn your right foot outwards and left foot slightly towards the direction of the left foot to begin to get into Virdhadrasana I.
- Lift your arms above your head and stay in this position while breathing deeply.
- Now, rotate your torso to right turn your face to look on the right side.
- Hold this position for a few breaths.
- Bend your right leg in such a way that the thigh is parallel to the floor while exhaling.
- Your knee must be in a straight line or directly positioned above the heel.
- This is the final Veerabhadrasana pose.
- Stay in this pose for a few breaths or for as long as you feel comfortable.
- Release the pose and stand straight in Tadasana.
Ardha Matsyendrasana or The Seated Spinal Twist Pose
This yoga pose twists the body to keep the bones healthy and strong and give the body a very good stretch. It also helps in relaxing the back and neck thereby relaxing the body after a tiring day.

Steps to Practice Ardha Matsyendrasana or The Seated Spinal Twist Pose
- Sit in Dandasana on the yoga mat.
- From Dandasana, lift your right leg and place it on the outside of left leg besides the left knee.
- Now, bend the left knee and place the heel of left leg to touch the right hip on the side.
- Place your right arm behind your back while inhaling deeply.
- From this position, take the left arm upwards and bring your left arm and tuck it in you right knee.
- Try to touch the left knee or the right foot with the palm of the lower arm.
- Bend your spine towards right in such a way that you feel stretch in the side and the spine.
- Twist more towards the right starting from the lower torso to chest while exhaling deeply.
- Keep your head at the side while stretching in this position.
- Stay in this position for a few breaths.
- Release the pose by straightening your head and neck to look straight.
- Come back to sit in Dandasana and rest for a few seconds and practice Ardha Matsyendrasana on both sides.
Salabasana or The Locust Pose
This yoga pose starts by raising the legs and torso from the floor. It helps in keeping the bones healthy and strong when practiced every day.
Steps to Practice Salabasana or The Locust Pose
- Lie down on your stomach or belly on a yoga mat.
- To practice Locust pose, keep your legs and feet together
- Bring your arms in front of your body and keep them straight.
- Raise you arms and torso from the floor.
- When comfortable, start raising the legs from the floor in such a way that only your stomach is resting on the floor.
- Your big toes should be turned toward each other while practicing Shalabhasana or The Locust Pose
- Close your eyes and relax in this pose.
- Keep breathing deeply and release the pose by bringing the body back to rest on the ground.
- Bring your arms to rest along the side of the body.
- While practicing Shalabhasana or The Locust Pose in this position, your scapula or the shoulder blades should be pressed into your back.
Ardha Chandrasana or the Half-Moon Pose
Ardha chandrasana is said to cure the osteoporotic pain in addition to giving the hamstrings, arms and abdomen a good stretch.

Steps to Practice Ardha Chandrasana or the Half-Moon Pose
- To do this yoga pose for better bones, stand straight on the floor or on your yoga mat with your feet hip width apart.
- Feet must be parallel to the edges of your mat.
- From this position extend your arms in such a way that they are parallel to the floor.
- Move your left foot slightly inwards and right foot outwards in such a way that the right foot and foot are at ninety-degree angle and are pointing straight forward.
- While inhaling place your left hand on your left hip and while exhaling bends the right knee while taking the right finger tips to the floor while maintaining a distance of a few inches between the right foot and fingertips.
- Stabilize the right foot on the floor and start to straighten the leg. After the right leg is straight, start lifting your left leg upward while balancing on the right foot and right hand.
- Keep lengthening the left leg until it comes in a straight line with your torso.
- From this position, take your left arm upwards in such a way that both right and left arms are in a straight line.
- This is the final Ardha Chandrasana position.
- Keep inhaling and exhaling deeply in this position.
- Repeat the same steps on the other side.
Parivrtta Trikonasana or The Revolved Triangle Pose
Parivrtta Trikonasana or The Revolved Triangle yoga pose help stimulate bone growth by gently tugging on to your hip bones and spine. It is also very helpful in keeping the osteoporotic pain at a bay.
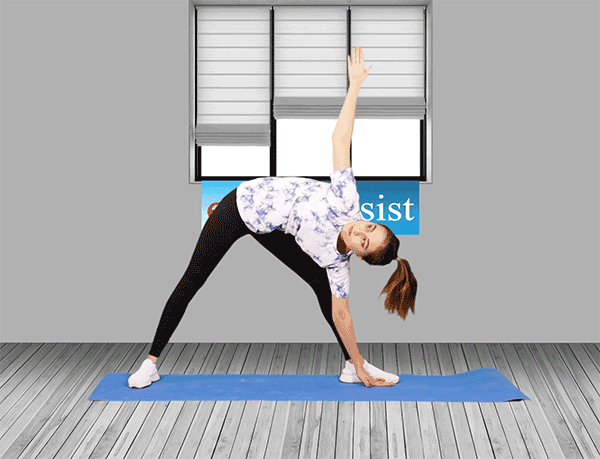
Steps to Practice Parivrtta Trikonasana or The Revolved Triangle Pose
- To do this yoga pose for better, stronger and healthier bone, stand in Tadasana on the yoga mat.
- From Tadasana, step the feet just over a leg length apart.
- Now from this position, turn the right foot 90 degrees to the right and the left foot slightly toward the right foot.
- Make sure that your heels are pressing the ground and the weight of your entire body is balanced and distributed on both of your feet.
- Raise the arms to shoulder height and extend the arms parallel to the floor in such a way that your palms are facing down.
- Bend your body towards right while exhaling deeply and make sure to not bend the body. The spine should be straight in this position.
- While keeping your body straight bend your right knee and lift your left hand up and let your right hand touch the ground.
- Both your arms should form a straight line while practicing Trikonasana or The Triangle Pose.
- Allow your head to be in a neutral position in such a way that your gaze is fixed on the left palm while practicing Trikonasana.
- Release the pose by coming back in upright position and practice the asana from the opposite side.
- Practice the Asana three to four times from both sides.
Utthita Parsvakonasana or The Revolved Triangle Pose
This yoga pose improves the flexibility and physical balance and increase the strength of the body by increasing the bone mass. This will help one not to get fractured or hurt with small injuries.
Steps to Practice Utthita Parsvakonasana or The Revolved Triangle Pose
- Stand in Tadasana on the floor or on the yoga mat.
- Take your feet a little more than shoulder width apart while exhaling deeply.
- From this position, raise your arms parallel to the floor and take them to the sides with shoulder blades wide and palms down.
- Turn your left foot in slightly to right and right foot out to ninety degrees.
- While performing Utthita Parsvakonasana, one leg is in front and the other one is on the back.
- The leg on the back should not be bent while practicing the asana.
- Spine must be kept straight while practicing this asana.
- Bend the knee of the front leg and keep it in line with the ankle. Keep your knee straight and perpendicular to the floor.
- Now from this position raise your torso and line it with your back leg.
- Also, take your left arm to touch the ground and raise the right arm towards the ceiling.
- Lift your head and look above towards the right hand while breathing deeply.
- Stay in this position for a few breaths.
- Practice Utthita Parsvakonasana from the other side as well.
- To release the pose, the back foot should be pressed firmly.
- Exhale while coming to the straight posture with your arms pressed at shoulder height.