Yoga is considered an age-old science.(1) The physical practice calms the brain and makes one able of doing things and gives you peace. Yoga can heal us in innumerable ways.
Yoga is practiced by most of the people mechanically to get rid of the extra fat and bulges on the body. But the real benefits of yoga lie in its capability to heal us internally as well as externally. The ultimate goal of yoga is to help us meet with the divine and that is only possible if we are fit internally and our internal chords are in sync.
Anxiety, tension, fear and depression are the modern life threatening diseases, which have been making people weak and even killing people slowly. One of the best cures which is available to us in the modern times is yoga, which can help us cast aside these evils which plan to kill us softly.
We need to get on track ourselves and make our lives better by accepting yoga as a means of natural healing and for prevention of other life threatening diseases as well. By practicing half-an-hour of yoga and meditation everyday can help tame the evils like fear, anxiety, stress, tension and depression.(2, 3, 5, 6, 13)

Yoga For Fear And Anxiety
Let us discuss how Yogasana helps us in getting rid of depression:
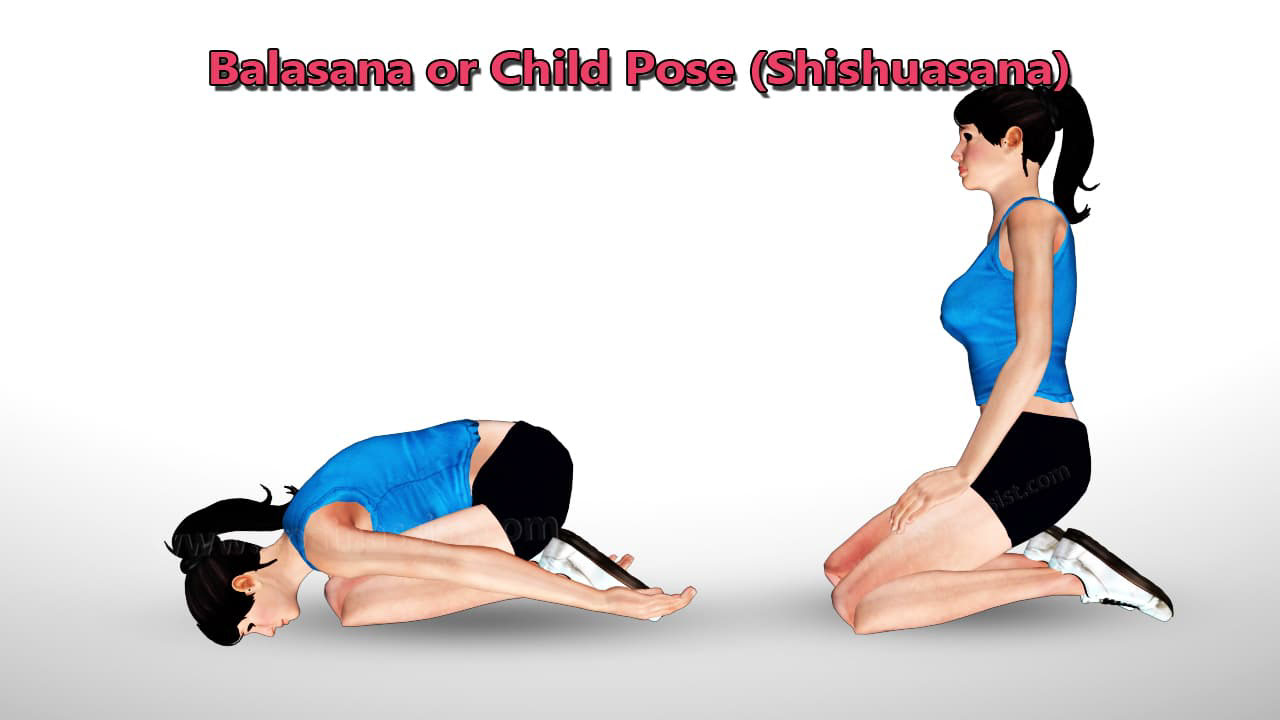
Balasana or The Child’s Pose
Benefits of Balasana or the Child’s Pose for Fear and Anxiety(4, 5, 7)
- Relieves the stress and anxiety with deep breaths while the head is lowered to the ground.
- Stretches the muscles of lower back and hips and gives a feeling of relaxation after a very tiring day.
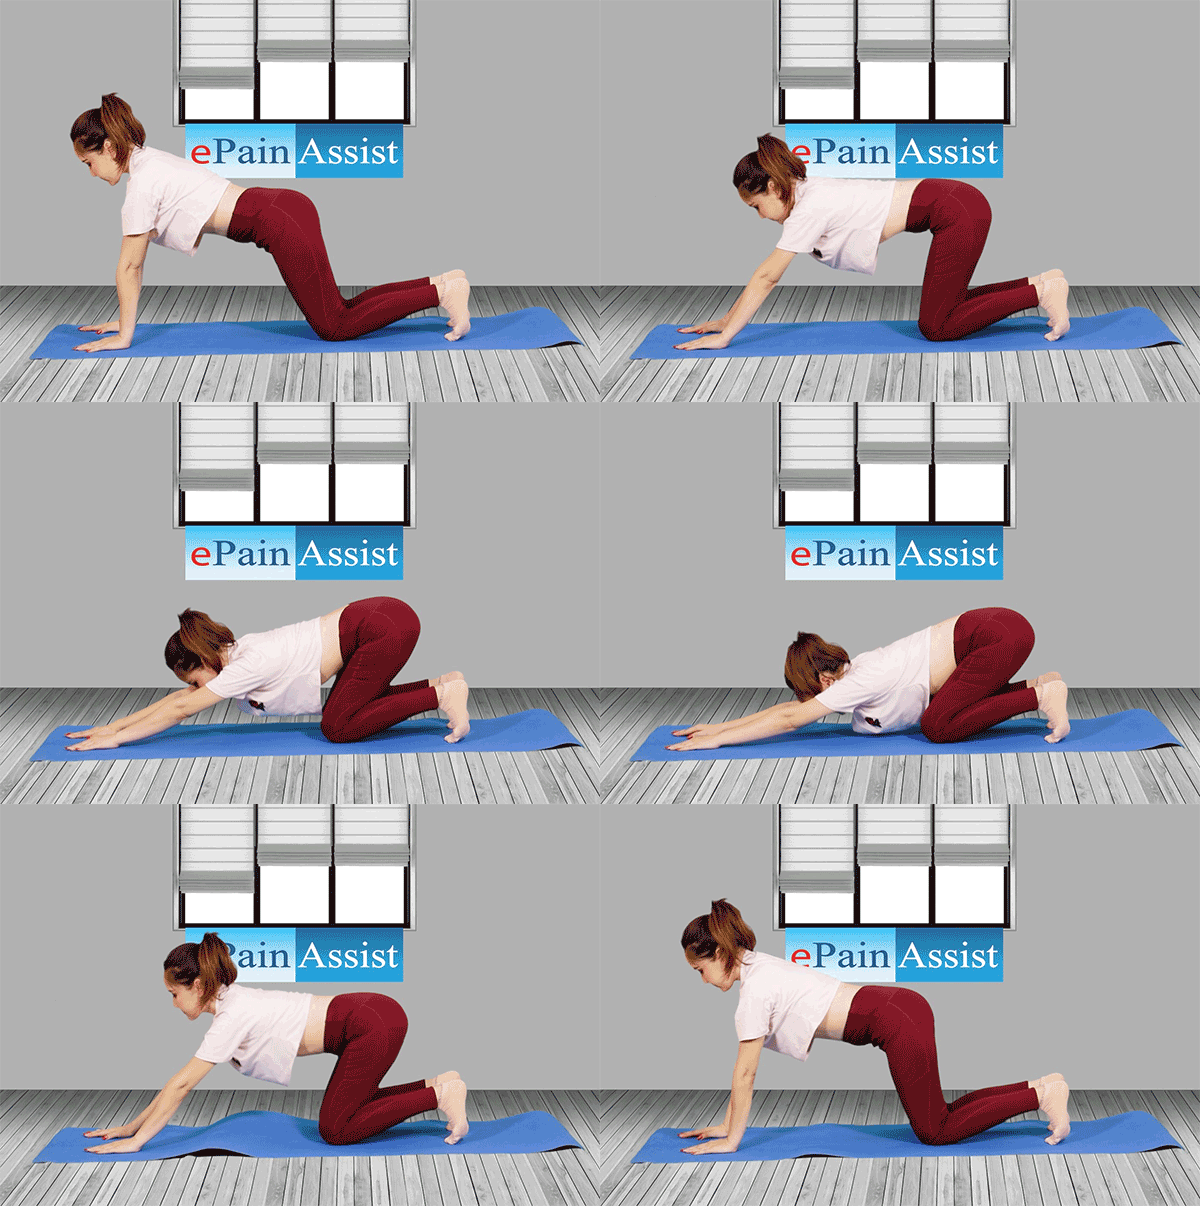
Steps to Practice Balasana or the Child’s Pose:
- To practice, Ananda Balasana or The Happy Baby Pose, lie on your back on the ground or on the Yoga Mat.
- While inhaling deeply, fold both of your legs from the knees and bring them as close as possible to your belly.
- Press the folded legs into your belly if your body is flexible enough. Make sure that you do not ever stretch your body while doing this. Go only as far as your body allows.
- Exhale deeply in this position.
- While inhaling deeply again, hold the outside part of your feet with your hands. Bring your knees to widen a little more than your torso and bring and bring your knees to push into your underarms. You can also use a yoga prop like a strap or a scarf to stretch your legs if it is not possible for your hands to reach your feet.
- In this position, your ankle should be positioned a little above your knee and your shins should be perpendicular to the ground.
- Gently open up your hips to intensify the stretch.
- While practicing Ananda Balasana or The Happy Baby Pose, tuck your chin into the chest and make sure that your head is always touching the floor.
- While you press your heels up with your hands, press the sacrum and tailbone into the ground while practicing Ananda Balasana or The Happy Baby Pose.
- Also, press the back of neck and shoulders into the floor. While practicing Ananda Balasana or The Happy Baby Pose, the back should be lying straight on the floor.
- Breathe normally and stay in the pose for a few breaths or for as long as your body feels comfortable.
- Release the pose while exhaling and by leaving the grip on your feet in such a way that the legs are stretched straight on the floor.
- Relax in Shavasana for a few seconds and proceed to the next asana.
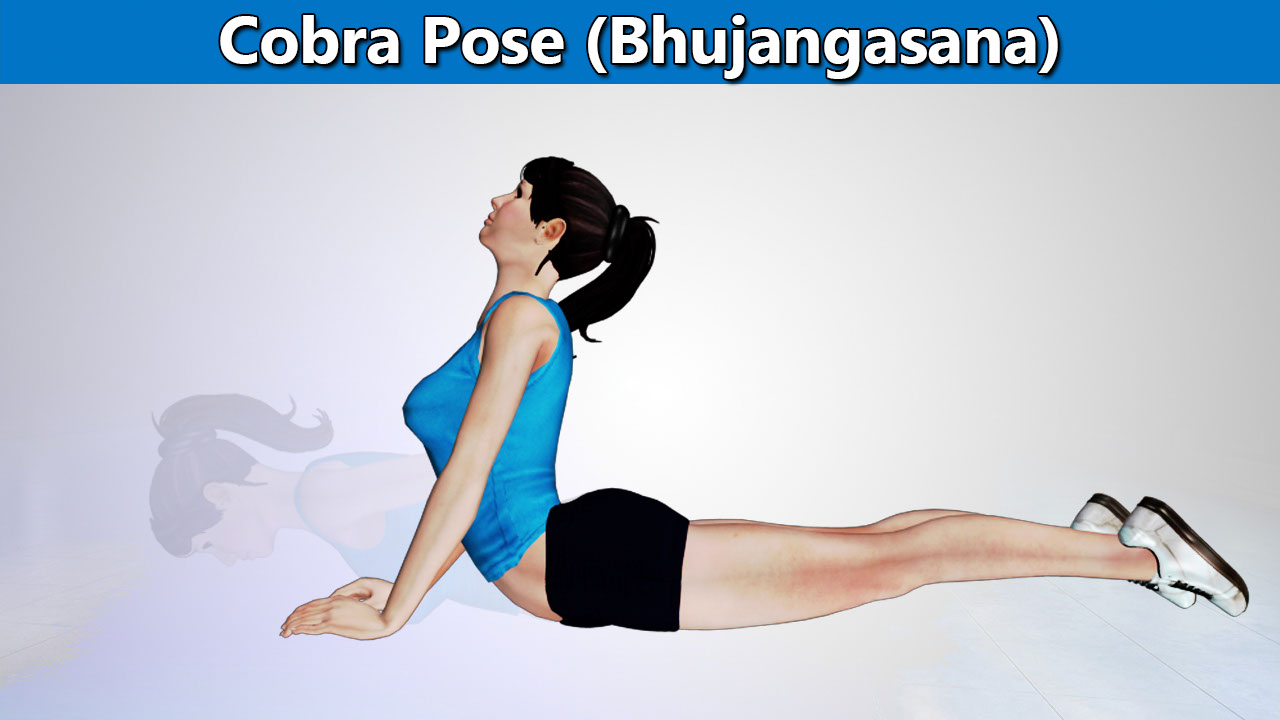
Bhujangasana or The Cobra Pose(7)
Benefits of Bhujangasana or the Cobra Pose for Fear and Anxiety:
- The Cobra Pose helps is instilling energy in the body with a lift of the upper portion of the body.
- The Cobra Pose changes the mood instantly and gives self confidence.

Steps to Practice Bhujangasana or the Cobra Pose:
- To practice Bhujangasana or The Cobra Pose, lie prone on the floor or the yoga mat i.e. on your stomach with the top of your feet and chin resting on the floor.
- Legs should be kept close together with the heels and feet lightly touching each other.
- Place your palms facing downwards i.e. facing ground and below the shoulders with the fingers of your hand outwards i.e. other side of the body.
- While practicing Bhujangasana or The Cobra Pose, the elbows should be kept parallel to each other and close to the body.
- While inhaling deeply, gently raise your head, chest and abdomen up while keeping the navel and pelvis touching the floor.
- Take your shoulders back and down in such a way that the head is tilted backwards and the chest is opened forward while practicing Bhujangasana.
- Focus your gaze forward or upwards depending upon the flexibility of your neck and spine or till where you are able to bend backwards.
- Raise your body upwards till your arms become straight on the ground.
- Keep pressing the ground with your pelvis. Also, make sure that you are not putting a lot of tension in your arms.
- At a point where you are comfortable, hold the pose for 20-30 seconds.
- Straighten your spine to a point where you are comfortable. Do not overstretch or exert yourself.
- While exhaling, gently take your body downwards to rest on the floor.
- Relax with your hand stretched outwards and chin touching the floor.
Adho Mukha Svanasana or The Downward Facing Dog(8)
Benefits of Adho Mukha Svanasana or the Downward Facing Dog for Fear and Anxiety:
- Adho Mukha Svanasana helps in draining all the negative energy from the body which are the cause for fear and anxiety.
- Adho Mukha Svanasana or The Downward Facing Dog yoga pose helps in reducing the fatigue and strengthening the brain which allows it to get rid of fear and anxiety.

Steps to Practice Adho Mukha Svanasana or the Downward Facing Dog:
- To practice Adho Mukha Svanasana stand on floor or on the yoga mat.
- Kneel on the yoga mat or floor in such a way that the whole body is supported with hands and knees on the floor. Make sure your knees are in straight line with the hips in this position.
- Make your palms spread on the yoga mat make sure that the maximum force is exerted with the index finger on the floor. Your forefingers should turn a little parallel.
- While exhaling, lift your knees far from the floor in such a way that the knees come in line with the thighs and they are not bent.
- In the beginning, if you face any difficulty in keeping the knees straight, you can keep them a little bent and heels lifted from the floor.
- Try to raise you hip bones inside and try to draw your legs into the crotch.
- In this position, make the highest point of the thighs push back and let your heels touch the floor.
- Try to lift your body far from the ground while keeping your arms and legs straight.
- Keep your shoulders very firm and open up your chest in this position.
- Keep your head between your arms and make sure you are looking downwards and your head does not drop in this position.
- Adho Mukha Svanasana is also a part of Surya Namaskar and it is a very helpful asana to stretch all the muscles of your body.
- Stay in this position for a few breaths or for a few seconds.
- Maintain your breath while being in this position.
- Get back on your knees to release the asana and move your head to look upwards.
- Practice the same asana for 5-6 times.
- Relax in Balasana for some time after completing the practice.
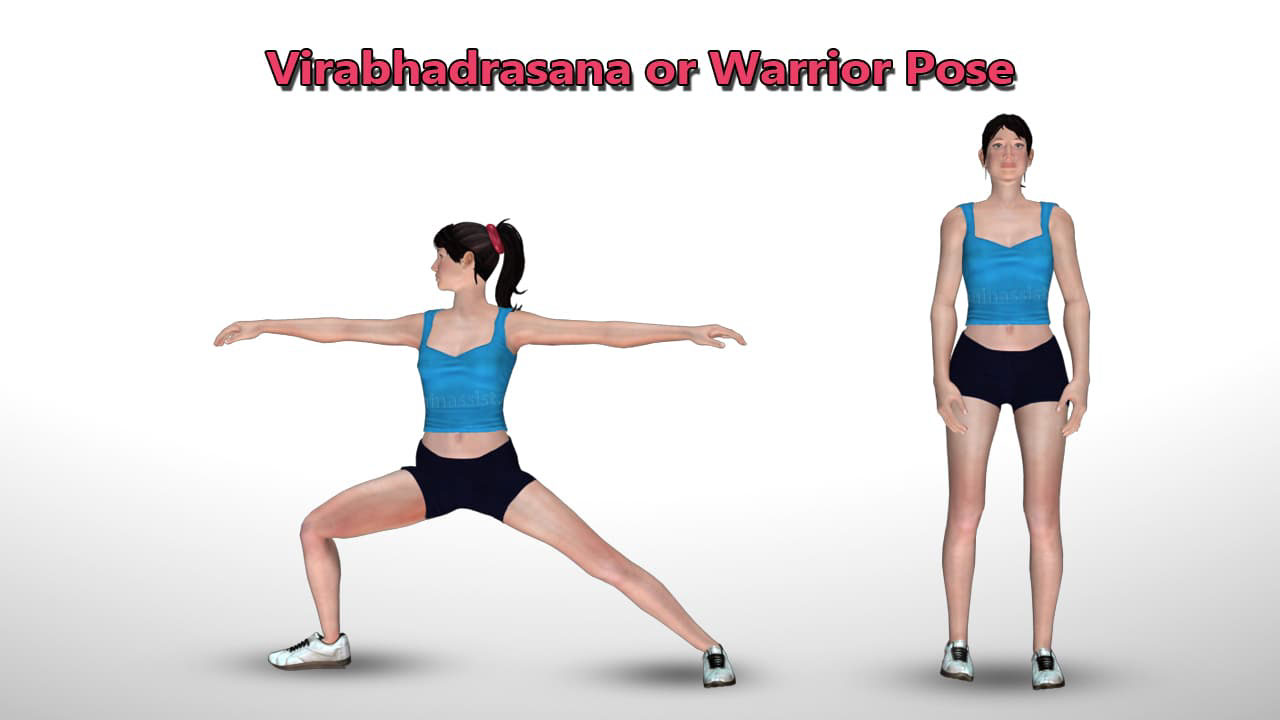
Virabhadrasana I or The Warrior I Pose
Benefits of Virabhadrasana or the Warrior Pose for Fear and Anxiety:(8)
- The Warrior Pose helps in relieving stress and anxiety by strengthening the core.
- Practicing The Warrior Pose gives courage and boosts self confidence to tackle with the disturbances in life causing fear and anxiety.
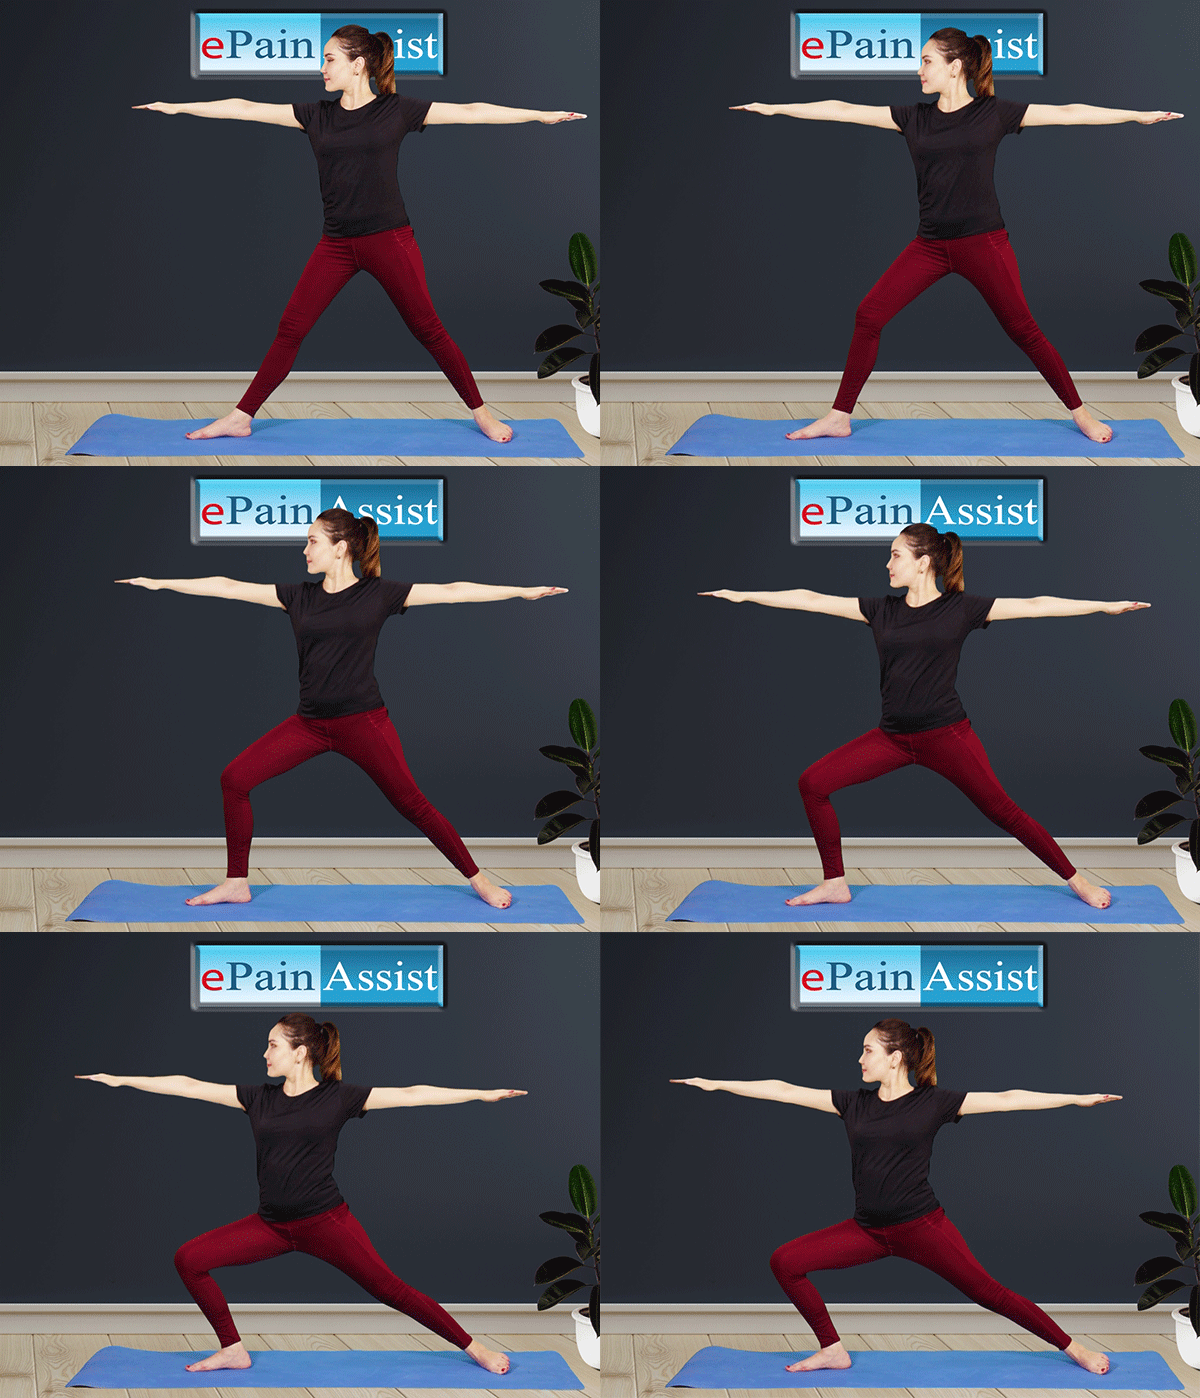
Steps to Practice Virabhadrasana I or the Warrior Pose:
- To practice Virabhadrasana, stand in Tadasana or Mountain Pose on the floor or on the yoga mat.
- Increase the space between both your legs by taking as step to the side. The feet should be at a distance of at least 3- 4 feet from each other.
- Turn your right foot 90 degrees to the right and left foot 60 degrees to the right in such a way that the right heel will be in alignment with the left heel.
- Raise your arms above your head so that they are perpendicular to the floor and parallel to each other and palms facing up.
- In this position, rotate your torso to right as much as possible. Your torso and your face will be looking on the right side. Note that only the movement of the torso will be done without making any movement in the leg or the ankle.
- Hold this position for a few breaths.
- Now, while exhaling bend your right leg in such a way that the thigh is parallel to the floor and the knee is in straight line with your ankle or directly positioned above the heel.
- In this position, the right knee will always point outwards.
- This is the final Virabhadrasana pose. Maintain this pose for a few breaths or for as long as you feel comfortable.
- This completes one round of Virabhadrasana.
- Return to the original position and practice the same for 5-6 times on both the sides for maximum benefits.
Setu Bandhasana or The Bridge Pose for Battling fear and Anxiety(9)
Benefits of Setu Bandhasana or the Bridge Pose for Fear and Anxiety:(9)
- Practicing the Bridge Pose turns your anxiety into calmness and relief.
- The Bridge Pose gives a sense of relief and increases positivity in life by stretching and strengthening the spine.

Steps to Practice Setu Bandhasana or the Bridge Pose:
- To practice Setu Bandhasana, lie on your back on floor or on yoga mat.
- Bend your knees in such a way that the sole of the feet should lie flat on the ground.
- There should be a distance of around 6 inches between your feet and your knees.
- The arms should rest on the floor alongside your body in such a way that the palms are lying flat and touching the ground.
- Press your back into the mat or the floor while practicing Setu Bandhasana.
- While inhaling, lift your lower back, and then middle back and the upper back gradually.
- Now press in to the mat with the heels of your feet to balance the body.
- Gently roll in your shoulders, and touch your chin to your chest. Make sure that you do not lower your chin while touching the chin to the chest. The chest should be raised in such a way that it touches the chin on its own.
- The weight of your body will be supported with your shoulders, arms and your feet.
- The thighs will be parallel to each other and to the floor while being in this pose.
- Make sure the entire weight of the body is on the shoulders and arms and not on the back.
- The whole weight of the body should be distributed and not concentrated on one part of the body.
- If you want to go further up and take the pose to next level, you can interlace your fingers with each other and push the floor with your hands to raise your torso even further.
- This is the final Setu Bandhasana pose.
- Keep breathing/ maintain breathing in this pose.
- Stay in this pose for a few breaths or 20-30 breaths or for as long as you feel comfortable.
- While exhaling, roll one shoulder and then the other and lower your body and come to the original position.
- Bring your lower back down, then the middle back and the upper back.
- Breathe deeply once you come down to the original pose.
- Straighten your legs on the floor or on the yoga mat.
- Relax in one of the relaxing yogasana like Shavasana.
Uttanasana or The Standing Forward Bend
Benefits of Practicing Uttanasana or the Standing Forward Bend for Fear and Anxiety (10):
- Uttanasana relieves tension in your shoulders, and neck and improves the functioning of your nervous system.
- Uttanasana also calms the brain and reduces anxiety.

Steps to Practice Uttanasana or the Standing Forward Bend:
- To practice Uttanasana, get into Tadasana on the floor or on the yoga mat.
- Bring your arms towards hips in make your hands rest on your hips.
- Take deep breath or inhale deeply and expand your chest while inhaling.
- While exhaling, fold your body starting from the hips and move forward. In this position, your upper body or torso will be perpendicular to the legs.
- Keep bending your body further forward and make your hands touch the floor on the side of your legs .This would require flexibility in the body.
- Uttanasana yoga pose will loosen your hamstring muscles over a period of time with practice. And, if you are not able to touch the floor with the hands, do not strain. Just go as far as you can without pain.
- With constant practice, you will be able to touch the floor with your hands. Also, make sure that you do not bend your knees while practicing Uttanasana yoga pose.
- Advanced level practitioners can touch their forehead to the knees or can make their head rest between the thighs and their hands can also clasp the ankles.
- This would be Uttanasana yoga pose’s final position. Stay in this position for a few breaths or for as long as your body feels comfortable.
- Stop practicing Uttanasana yoga pose, as soon as you start feeling pain in back, hips or the groin region.
- While inhaling, release the pose and come back to the standing position and place your hands on the hips.
- It is also advised to practice backward bending asanas like Bhujangasana and Dhanurasana after Uttanasana as counter yoga asanas.
Shavasana or The Corpse Pose
Benefits of Shavasana or the Corpse Pose for Fear and Anxiety:(11)
- Shavasana or the Corpse Yoga Pose gives a sense of ultimate relaxation and calmness.
- The Corpse Yoga Pose lets your body loose and dissolves all the negative energy thereby instilling positivity on the body.

Steps to Practice Shavasana or the Corpse Pose:
- To practice Shavasana or The Corpse Pose, lie on the floor on your back.
- Keep your feet a few inches apart and let them fall loose sideways.
- Let your arms lie alongside your body with your palms facing upwards.
- Now, gently close your eyes and let your whole body relax, slowly starting from your head to toe. Feel every part of your body getting relaxed.
- Take deep breaths and relax yourself in this pose for a considerable amount of time.
Makarasana or The Crocodile Pose for Fear and Anxiety
Benefits of Makarasana or the Crocodile Pose for Fear and Anxiety:(12)
- The Crocodile Yoga Pose helps is instilling energy in the body with a lift of the upper portion of the body.
- The Crocodile Yoga Pose changes the mood instantly and gives self confidence.
Steps to Practice Makarasana or the Crocodile Pose:
- To practice Makrasana or the Crocodile Yoga Pose, lie flat on your belly on a yoga mat or on the ground.
- Cross both the arms under the head in such a way that both arms cross each other.
- Rest your forehead on the wrists of your hands.
- Close your eyes and let your whole body relax. Feel the stress leaving your body in Makrasana.
- Relax your legs and let your hells turn out and open your legs a little such that you have little space between your legs.
- While inhaling deeply, press your belly on the ground.
- Keep still in this position for 6-8 constant breaths while practicing Makrasana or the Crocodile Yoga Pose.
- With a long and deep exhalation, allow your body to relax on the ground.
- To release from Makrasana, slowly bring your feet together.
- While releasing Makrasana or the Crocodile Yoga Pose bring your palms under your shoulder and come in to child pose or come on your back.
- https://www.ncbi.nlm.nih.gov/pmc/articles/PMC3193654/
- https://toppodcast.com/podcast_feeds/counselor-toolbox-podcast/
- http://deconstructingyourself.com/wp-content/uploads/2016/06/The_Mindful_Geek_Free_Giveaway.pdf
- https://www.thehealthsite.com/body-mind-soul/yogasanas-to-help-your-child-overcome-fear-k0917-520258/
- https://ru.b-ok2.org/book/3700212/5b1c09
- https://www.yogajournal.com/poses/yoga-by-benefit/anxiety
- https://www.indianmirror.com/games/yoga/yoga-anxiety.html
- https://www.yogajournal.com/practice/free-from-worry
- https://www.amayaan.com/blog/best-yoga-for-anxiety-and-stress
- https://www.yogapoint.com/articles/yogatherapyfortreatmentofanxiety.htm
- https://www.yogajournal.com/poses/corpse-pose
- https://worldpeaceyogaschool.com/blog/health-benefits-of-crocodile-pose/
- https://www.health.harvard.edu/mind-and-mood/yoga-for-anxiety-and-depression
Also Read:
- Does Yoga Improve Skin Tone?|Yoga Poses To Improve Skin Tone
- Which Yoga Poses Can help Stop Snoring?
- Where Is A Pulled Groin Muscle Located?|Best Yoga Poses For Pulled Groin
- Yoga Benefits for Improving Flexibility and Strength
- Can Yoga Help with Symptoms of Ankylosing Spondylitis?
- What Is Kundalini Yoga, Know its Poses, Mantra Meditation & Its Benefits
- 4 Dangerous Side Effects Of Hot Yoga

